Bonjour à tous,
Depuis longtemps je cherchais à domotiser ma boîte aux lettres. Les systèmes couramment utilisés, basés sur des capteurs d’ouverture, ne me satisfaisaient pas entièrement.
Impossible en effet de savoir si la porte de la boîte aux lettres avait été ouverte côté rue pour de la pub ou un colis ou encore une simple lettre, sans oublier les différents problèmes avec les colis
Il m’est arrivé de recevoir un SMS m’annonçant que mon colis était livré en mon absence. C’était une livraison importante, mais à mon retour au domicile, il n’y avait pas de colis dans la boîte aux lettres et il était trop tard pour contacter le transporteur.
Bref, plusieurs jours de perdus. De plus, je ne trouvais pas très WAF (Wife Acceptance Factor ) d’imposer un mode opératoire à quiconque ramasserait le courrier, afin d’acquitter les différents systèmes dans le bon ordre.
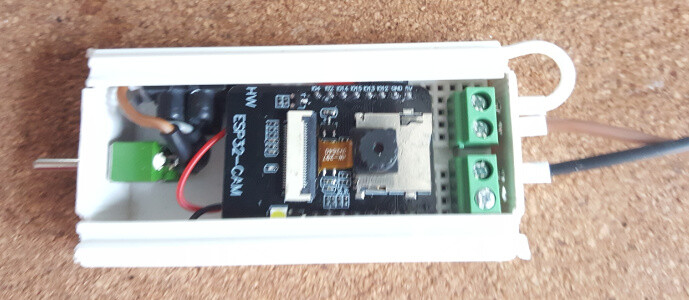
J’ai donc opté pour une solution vidéo DIY à 10.00€ ![]() C’est le module ESP32-CAM OV2640 qui compose le coeur du système. Cette caméra Wifi, 2MPx, facilement programmable sera alimentée en 5V. Le montage tient sur une mini Breadboard car j’ai ajouté un interrupteur de marche/arrêt et des borniers pour les connexions extérieures (alim).
C’est le module ESP32-CAM OV2640 qui compose le coeur du système. Cette caméra Wifi, 2MPx, facilement programmable sera alimentée en 5V. Le montage tient sur une mini Breadboard car j’ai ajouté un interrupteur de marche/arrêt et des borniers pour les connexions extérieures (alim).


La programmation et la mise en place ont demandé environ 2 heures de travail.
 (boitier prototype dans de la goulotte électrique)
La caméra est fixée à 45° côté jardin. De cette manière, elle ne se voit pas de la rue.


résultat sur IPX ( flash éteint / flash allumé)
En partant du tutoriel de Random Nerd Tutorials (ce tutoriel vous guidera pour la mise en place des libraries nécessaires à la compilation), j’ai modifié le code afin de pouvoir piloter le flash à distance. Il s’éteint automatiquement après quelques secondes.
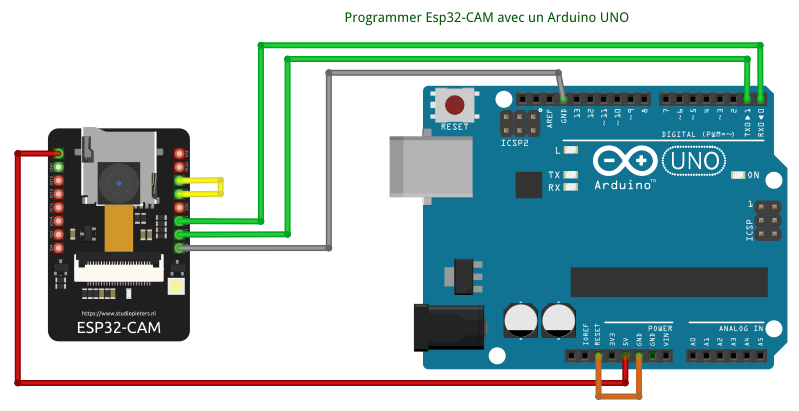
Dans le code C++ ci-dessous, ajustez vos paramètres wifi.
Compilez puis téléversez le code (pensez à relier IO0 à Gnd pour entrer en mode programmation)
/*********
  Rui Santos
  Complete project details at https://RandomNerdTutorials.com/esp32-cam-take-photo-display-web-server/

  IMPORTANT!!!
   - Select Board "AI Thinker ESP32-CAM"
   - GPIO 0 must be connected to GND to upload a sketch
   - After connecting GPIO 0 to GND, press the ESP32-CAM on-board RESET button to put your board in flashing mode

  The above copyright notice and this permission notice shall be included in all
  copies or substantial portions of the Software.
*********/

#include "WiFi.h"
#include "esp_camera.h"
#include "esp_timer.h"
#include "img_converters.h"
#include "Arduino.h"
#include "soc/soc.h"           // Disable brownour problems
#include "soc/rtc_cntl_reg.h"  // Disable brownour problems
#include "driver/rtc_io.h"
#include <ESPAsyncWebServer.h>
#include <StringArray.h>
#include <SPIFFS.h>
#include <FS.h>

// Replace with your network credentials
const char* ssid = "MonSSID";
const char* password = "123456789ABC";

// Create AsyncWebServer object on port 80
AsyncWebServer server(80);

boolean takeNewPhoto = false;
boolean isFlashOn = false;
boolean lightingLed=false;
unsigned long tempsInit=0;

// Photo File Name to save in SPIFFS
#define FILE_PHOTO "/photo.jpg"

// FLASH LED GPIO 4
#define LED_BUILTIN 4


// OV2640 camera module pins (CAMERA_MODEL_AI_THINKER)
#define PWDN_GPIO_NUM     32
#define RESET_GPIO_NUM    -1
#define XCLK_GPIO_NUM      0
#define SIOD_GPIO_NUM     26
#define SIOC_GPIO_NUM     27
#define Y9_GPIO_NUM       35
#define Y8_GPIO_NUM       34
#define Y7_GPIO_NUM       39
#define Y6_GPIO_NUM       36
#define Y5_GPIO_NUM       21
#define Y4_GPIO_NUM       19
#define Y3_GPIO_NUM       18
#define Y2_GPIO_NUM        5
#define VSYNC_GPIO_NUM    25
#define HREF_GPIO_NUM     23
#define PCLK_GPIO_NUM     22

const char index_html[] PROGMEM = R"rawliteral(
<!DOCTYPE HTML><html>
<head>
  <meta name="viewport" content="width=device-width, initial-scale=0.6">

</head>
<body>
  <div id="container">
      <button onclick="capturePhoto()">CAPTURE PHOTO</button>
      <button onclick="location.reload();">REFRESH</button>
      <button onclick="piloteFlash();">FLASH</button>
    </p>
  </div>
  <div><img src="saved-photo" id="photo" width="70%"></div>
</body>
<script>
  var deg = 0;
  var autoR=0;
  var x;

  function myRefresh(){
    location.reload();
  }

  function piloteFlash(){
    var xhr = new XMLHttpRequest();
    xhr.open('GET', "/flash", true);
    xhr.send();
    val4=digitalRead(LED_BUILTIN);
    if (isFlashOn){digitalWrite(LED_BUILTIN, HIGH);}
    else {digitalWrite(LED_BUILTIN, HIGH);}
  }
  function capturePhoto() {
   // digitalWrite(LED_BUILTIN, HIGH);
    var xhr = new XMLHttpRequest();
    xhr.open('GET', "/capture", true);
    xhr.send();
    setTimeout(myRefresh,2000);
  }
  function rotatePhoto() {
    var img = document.getElementById("photo");
    deg += 90;
    if(isOdd(deg/90)){ document.getElementById("container").className = "vert"; }
    else{ document.getElementById("container").className = "hori"; }
    img.style.transform = "rotate(" + deg + "deg)";
  }
  function isOdd(n) { return Math.abs(n % 2) == 1; }
</script>
</html>)rawliteral";

void setup() {
  // Serial port for debugging purposes
  Serial.begin(115200);
  pinMode (LED_BUILTIN, OUTPUT);

  // Connect to Wi-Fi
  WiFi.begin(ssid, password);
  while (WiFi.status() != WL_CONNECTED) {
    delay(1000);
    Serial.println("Connecting to WiFi...");
    digitalWrite(LED_BUILTIN,HIGH);
    delay(500);
    digitalWrite(LED_BUILTIN,LOW);
  }
  if (!SPIFFS.begin(true)) {
    Serial.println("An Error has occurred while mounting SPIFFS");
    ESP.restart();
  }
  else {
    delay(500);
    Serial.println("SPIFFS mounted successfully");
  }

  // Print ESP32 Local IP Address
  Serial.print("IP Address: http://");
  Serial.println(WiFi.localIP());

  // Turn-off the 'brownout detector'
  WRITE_PERI_REG(RTC_CNTL_BROWN_OUT_REG, 0);

  // OV2640 camera module
  camera_config_t config;
  config.ledc_channel = LEDC_CHANNEL_0;
  config.ledc_timer = LEDC_TIMER_0;
  config.pin_d0 = Y2_GPIO_NUM;
  config.pin_d1 = Y3_GPIO_NUM;
  config.pin_d2 = Y4_GPIO_NUM;
  config.pin_d3 = Y5_GPIO_NUM;
  config.pin_d4 = Y6_GPIO_NUM;
  config.pin_d5 = Y7_GPIO_NUM;
  config.pin_d6 = Y8_GPIO_NUM;
  config.pin_d7 = Y9_GPIO_NUM;
  config.pin_xclk = XCLK_GPIO_NUM;
  config.pin_pclk = PCLK_GPIO_NUM;
  config.pin_vsync = VSYNC_GPIO_NUM;
  config.pin_href = HREF_GPIO_NUM;
  config.pin_sscb_sda = SIOD_GPIO_NUM;
  config.pin_sscb_scl = SIOC_GPIO_NUM;
  config.pin_pwdn = PWDN_GPIO_NUM;
  config.pin_reset = RESET_GPIO_NUM;
  config.xclk_freq_hz = 20000000;
  config.pixel_format = PIXFORMAT_JPEG;

  if (psramFound()) {
    config.frame_size = FRAMESIZE_UXGA;
    config.jpeg_quality = 10;
    config.fb_count = 2;
  } else {
    config.frame_size = FRAMESIZE_SVGA;
    config.jpeg_quality = 12;
    config.fb_count = 1;
  }
  // Camera init
  esp_err_t err = esp_camera_init(&config);
  if (err != ESP_OK) {
    Serial.printf("Camera init failed with error 0x%x", err);
    ESP.restart();
  }

  // Route for root / web page
  server.on("/", HTTP_GET, [](AsyncWebServerRequest * request) {
    request->send_P(200, "text/html", index_html);
  });

  server.on("/capture", HTTP_GET, [](AsyncWebServerRequest * request) {
    takeNewPhoto = true;
    request->send_P(200, "text/plain", "Taking Photo");
  });

  server.on("/saved-photo", HTTP_GET, [](AsyncWebServerRequest * request) {
    request->send(SPIFFS, FILE_PHOTO, "image/jpg", false);
  });

    server.on("/flash", HTTP_GET, [](AsyncWebServerRequest * request) {
    lightingLed = true;
    request->send_P(200, "text/plain", "Lighting flash");
  });

  // Start server
  server.begin();

}

void loop() {
  if (millis()-tempsInit>=10000 && isFlashOn){
  digitalWrite(LED_BUILTIN,LOW);
  isFlashOn=!isFlashOn;}

  if (takeNewPhoto) {
    capturePhotoSaveSpiffs();
    takeNewPhoto = false;
  }
    if (lightingLed) {
    piloteFlash();
    lightingLed = false;
  }
  delay(1);
}

// Check if photo capture was successful
bool checkPhoto( fs::FS &fs ) {
  File f_pic = fs.open( FILE_PHOTO );
  unsigned int pic_sz = f_pic.size();
  return ( pic_sz > 100 );
}

// Capture Photo and Save it to SPIFFS
void capturePhotoSaveSpiffs( void ) {
  camera_fb_t * fb = NULL; // pointer
  bool ok = 0; // Boolean indicating if the picture has been taken correctly

  do {
    // Take a photo with the camera
    Serial.println("Taking a photo...");

    fb = esp_camera_fb_get();
    if (!fb) {
      Serial.println("Camera capture failed");
      return;
    }

    // Photo file name
    Serial.printf("Picture file name: %s\n", FILE_PHOTO);
    File file = SPIFFS.open(FILE_PHOTO, FILE_WRITE);

    // Insert the data in the photo file
    if (!file) {
      Serial.println("Failed to open file in writing mode");
    }
    else {
      file.write(fb->buf, fb->len); // payload (image), payload length
      Serial.print("The picture has been saved in ");
      Serial.print(FILE_PHOTO);
      Serial.print(" - Size: ");
      Serial.print(file.size());
      Serial.println(" bytes");
    }
    // Close the file
    file.close();
    esp_camera_fb_return(fb);

    // check if file has been correctly saved in SPIFFS
    ok = checkPhoto(SPIFFS);
  } while ( !ok );
}
void piloteFlash( void ) {
  if(!isFlashOn){digitalWrite(LED_BUILTIN, HIGH);}
  else{digitalWrite(LED_BUILTIN,LOW);}
  isFlashOn=!isFlashOn;
  tempsInit=millis();
  }
Sur ipx800 v4, il suffit de créer un widget type HTML et coller ce code
<style>
    #wrap { width: 1920px; height: 1080px; padding: 0; overflow: hidden; }
    #frame { width: 1920px; height: 1080px; border: 1px solid black; }
    #frame {
       -ms-zoom: 0.25;
       -moz-transform: scale(0.25);
       -moz-transform-origin: 0 0;
       -o-transform: scale(0.25);
       -o-transform-origin: 0 0;
       -webkit-transform: scale(0.25);
       -webkit-transform-origin: 0 0;
       }
</style>
<body bgcolor=0 scroll="no" style="overflow: hidden">
    <div id="wrap">
       <iframe allowtransparency="true style="background-color: 0;" id="frame" src="http://192.168.0.77/"></iframe>
    </div>
</body>
il suffira d’ajuster le zoom (0.25 dans l’exemple) et l’adresse ip de la caméra (192.168.0.77 dans l’exemple)
cdt